Start by looking for clues on the surfaces: puddles, damp spots, and water stains are hard to miss. Basements and crawl spaces with water intrusion might show peeling paint or even chalky white powder on the walls from evaporating water. Even small wet spots point to a water intrusion problem before bigger damages happen.
To ensure your basement or crawl space remains dry and protected, it’s crucial to address potential water intrusion issues promptly. Regular inspections and maintenance can help identify vulnerabilities before they become major problems. If you notice signs of water damage, such as dampness or mold, it’s essential to act quickly. You can discover your options for effective water damage restoration and prevention strategies that suit your specific needs. By taking proactive measures, you can safeguard your home from costly repairs and maintain a healthy living environment. Remember, a well-protected basement or crawl space not only enhances your home’s value but also provides peace of mind.
Don’t ignore stains on floors or around seams, especially after heavy rain. These areas hint that water is finding ways inside. Noticing these warning signs can help you stop moisture damage before it gets bad.
If you catch these early, there’s a chance to fix the source, saving you the headache of major repairs later.
Detecting Musty Odors and Increased Humidity
One of the less obvious signs is a persistent musty smell. If a basement or crawl space has water intrusion, it often feels muggy and thick, even more so than the rest of the house. A cheap humidity gauge can quickly reveal if the air is holding too much moisture.
A humidity reading over 50% is a red flag. Combine that with stuffy air and the telltale scent of dampness, and it’s time to check for unseen water leaks.
Wondering why it’s so important to act fast? Left alone, humid air makes mold and decay a lot more likely, and it doesn’t take long for conditions to get worse.
Spotting Mold, Rot, and Pest Infestations
Look at wood beams and insulation. Mold shows up as dark spots or fuzzy patches, while rotting wood looks soft and crumbly. If you see rust on metal pipes or fixtures, that’s another clue that water intrusion is at work.
More than just damage, these problems attract pests like termites and rodents, who love damp, hidden crawl spaces. If you notice chewed insulation, droppings, or nests, you may have a moisture problem fueling a pest issue too.
If these problems start popping up, address the water intrusion right away so you’re not left dealing with bigger issues down the road.
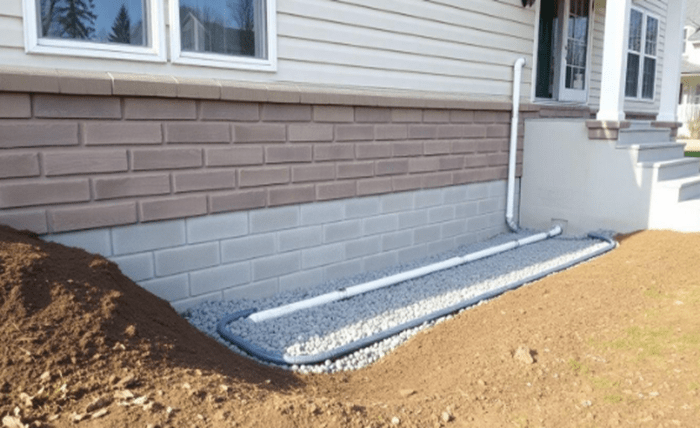
Improving Drainage Systems to Prevent Water Entry
Water entering basements or crawl spaces is often the result of poor drainage. A smart drainage plan can make a huge difference, stopping water before it even reaches your foundation. Let’s look at some steps to improve drainage systems and prevent water entry once and for all.
Grading Soil and Landscaping Away from Foundations
Grading means shaping the soil around your home so water moves away, not toward, the foundation. Lawns and flower beds sloping toward the house are trouble. A good goal: create a gentle slope—about 6 inches over 10 feet—directed away from the walls. If the soil erodes or flattens out over time, add more and tamp it down. Roots from shrubs or grass can help hold the soil in place and absorb excess moisture.
- Walk around the house after rain; mark spots where puddles form near the foundation.
- Use a landscaping rake to spread soil evenly.
- Mulch and ground cover slow down erosion and keep things neat.
With the right grading, yards work with your drainage systems to prevent water entry and give your house a better chance at staying dry.
Installing French Drains for Enhanced Water Control
Sometimes grading isn’t enough—the ground just stays soggy. That’s where French drains come in. These are trenches filled with gravel and a perforated pipe. The pipe collects water underground and carries it away from your home. If you’ve got thick clay soil or always have wet ground near the basement, installing a French drain may be your best move.
- Find where water gathers and dig a trench sloping away from the house (1–2% slope).
- Lay a perforated pipe at the bottom, cover with gravel, then top with soil or sod.
- Make sure the end of the drain empties somewhere downhill and safe.
French drains are a classic piece of any good drainage system and are reliable for controlling tricky water issues.
Maintaining and Extending Downspouts
Downspouts without proper extension let water pour right next to the house. That water can seep through even small cracks. So, make sure all gutters send rain at least five feet from your foundation. Add plastic or flexible downspout extenders if needed. Clean out leaves and sticks before every major storm so they don’t clog up.
- Check downspouts seasonally for blockages.
- Install extenders or splash blocks to push water even farther from the house.
- Repair any leaks in the joints or elbows.
Skipping regular checks means your entire drainage system will have to work extra hard to prevent water entry, so don’t ignore this simple fix.
Here’s a simple table to show drainage system improvements and their direct benefits:
| Drainage Improvement | Effect on Water Entry |
| Grading Soil Away from House | Reduces pooling |
| Installing French Drains | Moves water underground |
| Extending Downspouts | Directs water farther |
Good drainage systems to prevent water entry are your first line of defense, and just a few tweaks can save you a lot of cleanup headaches later.
Effective Solutions for Sealing Basements and Crawl Spaces
Basements and crawl spaces are hotspots for water problems. Keeping these areas dry is key to protecting your home. Let’s go through a few reliable strategies where basement waterproofing services really come into play, offering effective solutions for sealing basements and crawl spaces.
Patching Foundation Cracks and Gaps
Little foundation cracks may not look like much, but they’re common entry routes for water. Take a close look at your walls and floor. Use a wire brush to clear out debris before plugging up small cracks with waterproof masonry sealer. Hydraulic cement works best for larger gaps, since it expands and locks moisture out. Don’t forget – handling these repairs is one of the most effective solutions for sealing basements and crawl spaces.
- Clean cracks before sealing for a tight bond
- Use appropriate products: masonry filler for small cracks, hydraulic cement for larger gaps
- Inspect patched areas every few months for fresh signs of leaks
Applying Wall and Floor Vapor Barriers
Moisture vapor sneaks through even solid-looking concrete, and that’s where vapor barriers shine. Roll out either heavy-duty plastic sheeting or paint-on barriers to create a shield over exposed dirt, concrete, or stone. Lay vapor barriers directly over the floor and up the walls, overlapping edges for full coverage. This is a strong move if you’re serious about effective solutions for sealing basements and crawl spaces.
Apply overlapping seams and seal all edges with waterproof tape to prevent sneaky moisture from getting around the barrier.
Sealing Vents, Doors, and Utility Openings
Don’t overlook the small stuff. Openings like vents, doors, and places where cables and pipes poke through are all weak spots. Install covers over crawl space vents, add weatherstripping to doors, and close up utility gaps using high-quality caulk or spray foam. Make these inspections routine – sometimes it’s the smallest gaps that make the biggest messes.
Quick checklist for sealing entrances:
- Check all exterior vents for gaps or rust
- Replace cracked or broken door weatherstripping
- Inspect pipe and cable penetrations for air or light leaks
For lasting results, repeat these checks every season. Solid sealing efforts today will save headaches and repairs in the future.
Managing Interior Moisture for a Dry Environment
Controlling moisture inside basements and crawl spaces is step one for keeping water intrusion away. Left unchecked, humidity makes things musty, attracts pests, and leads to bigger issues like mold and rot. What matters most is finding the right combination of equipment and sealing strategies.
Using Dehumidifiers and Automatic Humidity Control
Dehumidifiers are the workhorses of a dry basement or crawl space. Run a dehumidifier with automatic humidity control to keep moisture around 45-50%. This setting hits the sweet spot—low enough to avoid mold, high enough to keep the air from getting too dry. For best results:
- Choose a unit sized for the square footage you want to protect.
- Drain collected water into a sump pit or directly outside, so you’re not emptying buckets every day.
- Opt for a model with a built-in hygrometer to check humidity at a glance.
A top-notch dehumidifier can make all the difference in stopping water intrusion from becoming an ongoing headache. For homeowners in Singapore looking to maintain a comfortable and healthy indoor environment, investing in a dehumidifier Singapore ensures you get reliable, high-quality options suited for local humidity conditions.
Humidity doesn’t just affect comfort—it creates the ideal environment for mold and pests, ruining air quality over time.
Installing Vapor Barriers and Crawl Space Encapsulation
Vapor barriers are thick sheets, usually plastic, that stop water vapor from rising through the floor. In crawl spaces, adding a vapor barrier is a simple must for homes in damp regions. For even more protection, encapsulation is the next level:
- Spread the barrier over the entire floor and extend up walls.
- Tape seams tightly so gaps don’t let moisture sneak in.
- Seal vents and small openings for the full encapsulation effect.
Done right, crawl space encapsulation nearly eliminates ground moisture, preventing condensation and major water intrusion inside the home.
Enhancing Ventilation and Insulation
Proper airflow chases out humid, stale air and pulls in drier air from outside. Mechanical fans and vented designs both have a place, but combine this with good insulation for best control.
- Insulate rim joists and crawl space walls using foam board or batts to keep moist air out and indoor air comfortable.
- Clear vents and install mechanical ventilation in humid regions, or close vents if you’re running encapsulation and dehumidifiers.
- Check that insulation stays dry and free of mold—wet insulation is worse than none at all.
Improving ventilation and insulation tackles both temperature swings and moisture, slashing the odds of water intrusion in any season.
The keyword ‘water intrusion’ should be part of every homeowner’s checklist. Without managing interior moisture, water intrusion quickly turns your basement or crawl space into a breeding ground for future problems.
Installing Sump Pumps and Interior Drainage Systems
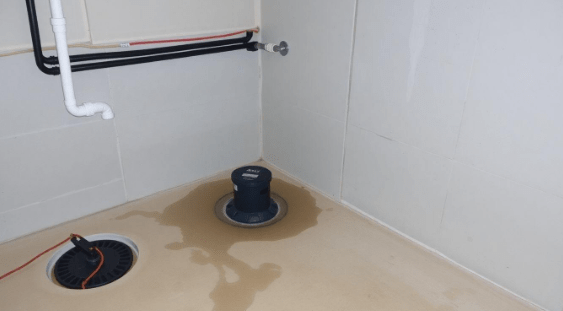
A dry basement or crawl space is often the result of choosing the right sump pump system paired with smart internal drains. These setups take water collection and redirection seriously, giving every homeowner a fighting chance against leaks and flooding. When water keeps showing up beneath your house, a sump pump and effective inside drains act like your own defense squad.
Choosing the Right Sump Pump System
Not every sump pump system suits every home. Some handle small leaks, while others are built for heavy floods. Here’s what helps with the selection:
- Check the water problem: Is it a trickle or a flood?
- Power source: Standard electric pumps get the job done, but a backup battery keeps you protected during outages.
- Size matters: Pick a pump with enough strength for your space.
Even the best sump pump needs the right sump liner and a tight-fitting lid to keep out dirt and unwanted smells. Better yet, a backup pump can save you during storms or blackouts.
Proper Placement and Discharge for Pumps
Placement is everything. A sump basin goes in the lowest spot where water collects, usually near the foundation’s deepest point. Attach a discharge line and route it far from the house—at least 10 feet if you can. Nothing’s worse than having the water you just pumped out flow right back in!
- Use a check valve to keep water from returning.
- Make sure the pipe slopes away from your foundation.
- Don’t dump water near walkways or neighbors’ yards.
An incorrectly placed discharge line can totally undo your efforts, sending water right back toward your foundation in a never-ending battle.
Maintaining and Testing Interior Drainage Solutions
A sump pump system is only as reliable as its maintenance routine. Regular checks and cleaning stop clogs before they turn into bigger problems. It’s not difficult—just time-consuming. Unplug and test your pump every season and remove debris from the pit.
Maintenance Checklist:
- Test the pump by pouring water into the basin.
- Clean mud and muck from the pit and piping.
- Look for leaks or loose connections on the discharge pipe.
Skipping checks or letting things build up can cost more later. Interior drainage and sump pumps are worth the effort—without them, basements and crawl spaces are left wide open for water problems.
Routine Maintenance and Professional Water Damage Restoration
Basements and crawl spaces are out of sight, but routine maintenance can’t be out of mind. Small water leaks or hidden mold can quickly turn into real headaches if ignored. Protecting these areas starts with simple habits and knowing when to call for professional water damage restoration.
Periodic Inspections for Early Detection
Taking time to check your basement or crawl space regularly makes all the difference. Look for new cracks, water stains, or puddles after heavy rain. Don’t forget to watch for musty odors or any signs of insect activity.
If you’re busy, set calendar reminders every three months just to poke your head in and look for obvious changes. Keep a flashlight and a checklist handy for these quick inspections.
Routine maintenance like this is your first line of defense—a little effort now saves major costs later.
Regular Cleaning and Debris Removal
Debris piles and clutter trap moisture, so keep these spaces clear. Sweep up dust, remove old boxes, and get rid of anything that shouldn’t be down there—especially wet or rotted items.
Blocked drainage channels can lead to standing water. Check any sumps, drains, or vents and give them a simple clean. Make it part of your seasonal home cleaning projects.
- Remove organic debris (leaves, wood scraps, cardboard boxes)
- Clean out gutters and drains
- Check that sump pump pits are clear
A clean space is much less likely to attract pests or hold moisture.
When to Hire Professional Water Damage Restoration Services
Sometimes, despite your best efforts, water seepage or worse hits hard. This is when professional water damage restoration matters most. Persistent standing water, spreading mold, or structural damage means it’s time to call in the pros.
Here’s when you shouldn’t hesitate to hire a water damage expert:
- Major flooding after storms
- Visible black or multicolored mold patches
- Sagging floors or rotting wood
They have specialized equipment—like moisture meters, industrial fans, and antimicrobial treatments—that most homeowners don’t.
If water keeps coming back, professional water damage restoration is a smart investment, not just a quick fix.
Routine maintenance and taking action quickly will keep your basement and crawl space dry and in good shape for years.
Addressing Yard Grading and Exterior Water Management
Keeping basements and crawl spaces dry often comes down to smart yard grading and managing water around the outside of the house. If water pools against the foundation, it’s only a matter of time before it looks for a way inside. A well-graded yard and proper exterior water management can stop wet basements before they start.
Identifying Problematic Yard Slopes
Walk the property after a big rain and check where water is collecting. If you spot puddles close to your walls or areas where the turf looks muddy for days, there’s a grading problem. Yard grading should always slope downward, away from the house, not towards it. Ideally, the soil should drop about one inch per foot for at least six feet from your foundation.
- Look for visible dips in the soil near the house.
- Watch water flow during storms—does it drift toward foundation walls?
- Note any areas where grass is struggling to grow; these spots often collect water.
Proper yard grading protects the basement and crawl space from everyday rainfall and sudden downpours.
Soil Buildup and Erosion Control
Solving poor slopes often means adding soil around the foundation. Shovel fresh topsoil against the house and rake it into a gentle slope away from the structure. Avoid piling soil above the siding—stop a few inches below for termite prevention. Use mulch or grass seed to shield the new soil from washing away in the rain.
- Add clay-heavy topsoil for best water-shedding results.
- Rake and tamp down to prevent erosion.
- Cover exposed areas with straw or seed immediately after grading.
A simple table can help show grade goals:
| Distance from Foundation | Desired Soil Drop |
| 1 foot | 1 inch |
| 6 feet | 6 inches |
Planting Vegetation for Additional Absorption
Roots help keep soil in place and soak up run-off. Planting hardy grass or shrubs near the home can add an extra layer of water management. Choose native species if you can—they’re adapted to local rain patterns and soils. Also, avoid planting large trees too close; roots can cause trouble for pipes and foundation walls.
- Use shrubs for year-round coverage.
- Pick deep-rooted grasses to fight erosion.
- Keep large trees at least 10-15 feet from the house.
Addressing yard grading is not just a one-time project—regular checks and a little maintenance keep water from sneaking in year after year. Keeping water away from your foundation lowers the chance of basement or crawl space leaks.
Conclusion
Keeping water out of basements and crawl spaces isn’t always easy, but it’s definitely worth the effort. A dry space under your home means less chance of mold, fewer pests, and a stronger foundation. Simple steps like checking for cracks, making sure the ground slopes away from your house, and keeping gutters clear can make a big difference. Sometimes, you might need to install a sump pump or even call in a pro for bigger drainage problems. Regular checks and a little maintenance go a long way. In the end, staying on top of these tasks helps protect your home and saves you from bigger headaches down the road.